- Get link
- X
- Other Apps
Featured Post
- Get link
- X
- Other Apps
If you have an iPhone, there’s a free Adobe app you need to try. It’s called Project Indigo — and it claims to offer more control and better image quality than the default iPhone Camera app. But is it really better?
In this review, we’ll test Adobe Indigo side-by-side with the native iPhone camera, show you where to find and install it, how to shoot photos in daylight and low light, how to edit your shots on both your phone and desktop, and of course — we’ll compare real results so you can decide which app takes the lead.
1.
Where to Find the Project Indigo App
Let’s start with the basics —
and Android users, don’t be disappointed!
Project
Indigo by Adobe is currently available only for iPhones.
It’s supported on iPhone 12 and
newer models.
You can download
Adobe Indigo for free directly
from the official App Store link
👉
https://apps.apple.com/us/app/project-indigo/id6742591546
This is a link to the official Adobe Research
page, where the developers explain
Indigo’s features and technology
in more detail:
👉
https://research.adobe.com/articles/indigo/indigo.html
If you’ve used Adobe Photoshop Camera in the past, note that it was discontinued in June 2024 — and Project Indigo is its next-gen replacement.
For this test, we’ll be using the iPhone 16 Pro, one of the latest supported devices.
We held off creating this review until a key update dropped — and trust us, you’ll understand why in just a moment.
2. How to use Project Indigo
For us, the biggest benefit is the full manual control, compared to the default app.
Tap the top of the screen to toggle tools like the horizon level, rule of thirds, zebra stripes, timer, and a few other helpful overlays.
Hit the gear icon to access
settings like exposure
control.
Here’s a quick
tip: if you want to protect your highlights, set
exposure to -0.3 and leave it there
— works great in most conditions.
We love the zebra display — it’s a clear, fast way to spot overexposure, and honestly, we prefer it over a histogram.
Manual focus is available too, though most users won’t need it often.
But the stars of the show? Manual shutter speed and ISO controls — finally, someone added them in a free iOS camera app!
You also get white balance temperature, with both presets and manual options, and you can even adjust tint.
Of course, if all this sounds like too much, just stick to auto mode — but then again… why use a manual camera app at all?
3. Night Mode
You can shoot at night in two expected ways — handheld or with a small tripod.
We’ll evaluate the results a bit later.
For now, let’s walk through the settings.
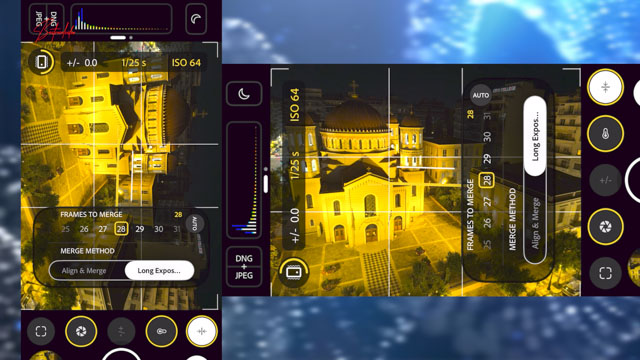
We’ve rotated the screen both horizontally and vertically, so you can clearly see the menus and options.
The basic Night
Mode is simple and effective.
But
the real upgrade in Adobe Indigo is the Merge
Method — where you can choose
how many frames to combine, or just leave it on auto.
Yes, computational
photography does its magic
here!
Maybe one day we’ll see features like this in our
mirrorless cameras
too.
You can select a zoom level of 2x,
5x, or 10x.
Keep
in mind — the iPhone 16
Pro already offers a native 5x zoom,
so you’ll want to evaluate this feature differently on older
models.
Now it's time to try Long Exposure mode — and yes, this definitely requires a tripod.
You can also choose how many frames to merge, depending on your preference.
This is where the zebra stripes become incredibly useful — helping you avoid overexposure in real time.
Watch how the screen updates live as you select a slower shutter speed — just like on mirrorless cameras.
And don’t forget: setting a 3 or 5-second countdown helps prevent blur from pressing the shutter.
Now, a quick spoiler before we
compare photo samples later:
This
setup gives us the best quality at night
— hands down.
You’ll see the countdown, and then wait for the magic to happen.
The app also shows you how long the processing will take, which, depending on your settings, might take several seconds — so be patient!
Unlock the power of lifelike AI voices with ElevenLabs! Perfect for creators, narrators, and businesses. Try it now! Start your voice journey here: https://try.elevenlabs.io/s0jpinoze8xo
4. Overheating Message
After
just a few daylight shots with Adobe Indigo, we got an overheating
warning on the iPhone.
To
be fair, we were shooting under the hot
Mediterranean sun in Greece,
with the temperature hitting 37°C.
Surprisingly, we also received an overheating message even during night use.
However, after installing the latest update available at the time of this video — version 1.0.2 — the warning no longer appeared.
That said, while there’s no visual overheating alert anymore, the phone still feels noticeably warm in hand during extended use.
How about you?
Have
you installed the latest version? Are you facing overheating issues,
especially on iPhones older than
the 16 Pro?
Let us — and everyone watching — know in the comments below!
We have used music from Uppbeat. You can check our personal referral link for more https://uppbeat.io/?referral=theocharis-rq932
5. Transfer Problems
Yes, the Project Indigo app supports both JPEG and DNG (RAW) formats, but there are a few issues you should know about.
First, in the iPhone’s photo gallery, it shows both a JPEG and a RAW version — but when you swipe down to view details, you’re only seeing the JPEG.
To access the full DNG
file, you’ll need to connect
your iPhone to a computer using a USB-C cable.
And
no, you can’t transfer the DNG
files to an external SSD directly from the phone
— we tried.
Adobe, any plans to fix this?
But that’s not all.
Even after you copy the files
to your computer, you’ll notice something odd:
The file
names are completely random.
Unlike Apple’s native camera app, which saves files using a
consistent format like IMG_1234,
the Indigo app names files however
it wants — with no clear
pattern.
It’s chaotic, and yes — a nightmare to organize.
Your best bet? Sort them by date. It’s not perfect, but at least it gives you some control.
✈️Support our journey! Your donation will fuel our pursuit of better equipment🎬resulting in enhanced travel guides!🌍
7. Evaluation Samples
And now, the moment of truth. A/B testing!
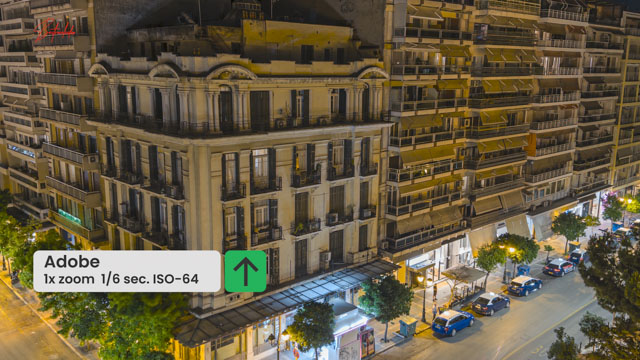
Keep in mind that photos taken with the iPhone app are about 12 Megapixels, while the ones taken with the Indigo app appear to be about 10 Megapixels.
Are we doing something wrong? Let us know!
For some, even the 2 extra Megapixels might be important.
If you want to be fair, convert both photos to the same size in order to compare.
An easy difference to spot is that even with HDR off, photos taken with Indigo seem to have more prominent highlights, but that can be fixed to an extend editing the DNG photos.
That’s why we mentioned earlier that it can be practical if you take photos with exposure set to -.0.3.
Watching both day and night pics at 200% or more, we see more noise in the photos taken with the iPhone.
In general, the Indigo pics seem to be more natural, with less macro blocks or digital artifacts and an absence of the dreadful halo effect.
We reached the same conclusion inspecting both day and night pics.
But, once more, we mostly care about the 5x pics, which are the once we compared.
Why? We’ll let you know in the next chapter.
8. Summary – Final Thoughts
Even after the latest firmware update, the iPhone still heats up quickly when using the Indigo app — but at least the overheating warning no longer pops up.
Of course, results may vary
depending on your device.
We’re using the iPhone
16 Pro.
As mentioned earlier, we genuinely believe Adobe Indigo shines in night photography, thanks to the extra control it offers.
But are we going to use it?
For daytime shots, we’ll stick with the default iPhone Camera app — especially since the iPhone 16 Pro takes full advantage of its 48-megapixel sensor.
For 5x zoom shots, though, Indigo is likely our go-to.
That said, even during the day — without using long exposure — Indigo takes noticeably longer to save each photo, meaning delays between shots.
And we’re really not fans of the disorganized file names and the fact that you can’t access or transfer DNGs on the go without a computer.
Is there a particular moment that stood out to you?
Let us know in the comments!
If you enjoyed this guide and the video, don’t forget to like, share, and subscribe to our channel for more travel adventures.
Subscribe https://www.youtube.com/bestravelvideo
Follow us at https://www.instagram.com/bestravelvideo/
https://www.tiktok.com/@bestravelvideo
Watch our shorts videos here! Subscribe and turn the bell on, to never miss new uploads! https://www.youtube.com/watch?v=mgQn7TId0MY&list=PLxRHhKvfPjpVgVNtvztP0R1WZBTAJeGeH
Before you leave, check out this video!
- Get link
- X
- Other Apps


